Tusker
Well-known member
I just finished this install for a buddy and thought I would post some pics.? In my opinion, the FJ60 power steering box is the best option for the Sami.? The pro's of the FJ are:
1.? Reverse Rotation Box:? With its forward-facing pitman arm, the FJ box fits comfortably under the zuk and gets the drag link way out in front where it belongs.
2.? Pitman Arm:? The stock FJ pitman arm is a joke, but the box has the same sector shaft as the IFS boxes so any of the pitman arms from OTT, Sky, or Marlin will fit and allow FJ-80 tre's or heims.
3.? Strength/Power:? The FJ-60 box is beefy.? It has a pitman arm which is longer than the IFS arms.? That means when you put the shorter IFS-type arm on the box, you automatically get an increase of about 20% in power")
4.? Loaction:? The box fits in a place that requires no cutting of any of the stock zuk parts (unlike the IFS that can in many instances require the removal of the front clip support).
The cons's of the FJ are availability/price.? They can be hard to come by.? I have bought two.? I paid $150 for one box (a good price) and stole the other for $75.? If you look around, you can find them for under $200.
For the install, we used the power steering pump and bracket from Spidertrax http://www.spidertrax.com/steering.htm? ?We used the Sky flat arm, but next time I might use their slightly dropped arm.? For the power steering box, you need to get a 16mm x 1.5 to 6AN high pressure adapter.? I got mine from ORME Brothers for $12 http://www.ormebrothers.com/ .? I also talked to Tom at Spidertrax and he said they had a source for these as well, and since they have all the hp and low pressure fittings you will need, they might be the best source for everything.? ?Spidertrax will also have the hp hose you need to use with the fittings to make your own hp hose for cheap.? For the crank pulley, you can get these off of the Suzuki Sprint, a Sidekick or Tracker with ps.? Brent at Trail Tough has them as well.
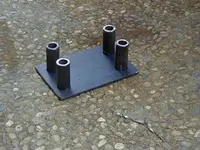
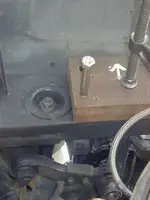
So let's get to the install.? The first thing is drilling and sleeving the frame.? If you have ever drilled a frame, you know it is TOUGH to get the holes drilled perfectly straight.? For my install, I used a Jethro-jig made out of some seriously hard wood.? Since the wood was 2" thick, it was a big help in guiding the drill bit and not letting me get it tweaked.

This picture with the bolt installed better illustrates the point:

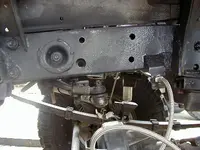
Here is a shot after all three holes were drilled out.? I used 1/2" bolts, and drilled the frame all the way through with 1/2" holes.? I also had to drill the box out to 1/2" as the stock holes were 12mm.

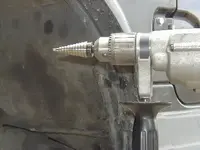
The next step was drilling out the holes in the face of the frame enough to fit the sleeves in.? My sleeves were 7/8" od and 1/2" id.? I used a step drill to enlarge the holes as a step drill does a pretty good job of keeping your holes cenetered and doesn't "wander" like a regular drill bit.

Here is a picture of the first hole reemed out to 7/8":

I then made a plate for the front face of the frame.? I used a piece of 4" wide 3/16" plate.? I used the steering box as a template and drilled the holes to 1/2", and then used the step drill in the drill press to enlarge the holes in the plate to 7/8".

Here is a shot of the face plate with the shims ready for install:

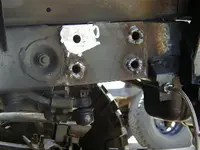
The next pic shows the sleeves welded in.? To get this right, I used a piece of 1/2" rod through the holes to keep the sleeves perfectly centered while welding:

After that, I ground the welds flat:

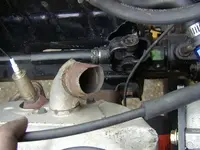
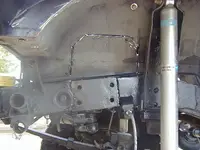
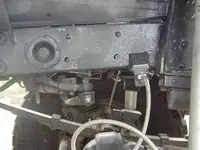
Then it was time to cut the wheel well out to fit the box.? The rear of this cut needed to eventually be opened up a bit, especially at the bottom to make room for the steering input shaft and u-joint:

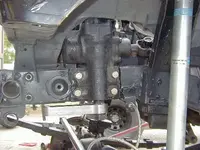
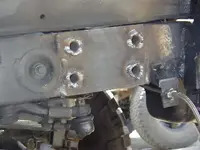
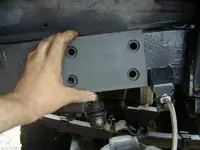
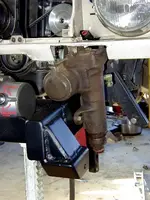
Finally, it was time to mount the box.? I should note that the placement of the box, especially the front holes is critical.? ?What you can't see from this picture, is that the two front holes were placed perfectly between the sides of the radiator support.? DO NOT FORGET to get these holes aligned to miss the radiator support before you start drilling.? This picture also shows the additional opening of the fender well.

The steering input shaft had to be shortened a LOT.? Here is a picture from the top:

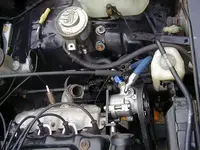
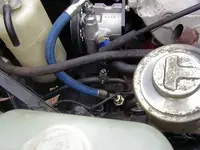
Here are a couple of pics of the plumbing. I didn't show the ps cooler, but you can see the line running to the front of the radiator where it is located.? For the pump fittings, I used a 90 degree out of the pump and a 45 degree on the box.?


That is about it.? I forgot to take pics of the drag link and pitman arm.? I will do that the next time Matt brings his rig over and update this.? You will see from those pics why I said that I would try the (slightly) dropped OTT or Sky arm next time.? You couldn't slide a piece of paper between the castle nut on the pitman arm ball joint and the frame ?? Although the drag link angle is not bad at all, a slightly dropped arm would help that too.
1.? Reverse Rotation Box:? With its forward-facing pitman arm, the FJ box fits comfortably under the zuk and gets the drag link way out in front where it belongs.
2.? Pitman Arm:? The stock FJ pitman arm is a joke, but the box has the same sector shaft as the IFS boxes so any of the pitman arms from OTT, Sky, or Marlin will fit and allow FJ-80 tre's or heims.
3.? Strength/Power:? The FJ-60 box is beefy.? It has a pitman arm which is longer than the IFS arms.? That means when you put the shorter IFS-type arm on the box, you automatically get an increase of about 20% in power
4.? Loaction:? The box fits in a place that requires no cutting of any of the stock zuk parts (unlike the IFS that can in many instances require the removal of the front clip support).
The cons's of the FJ are availability/price.? They can be hard to come by.? I have bought two.? I paid $150 for one box (a good price) and stole the other for $75.? If you look around, you can find them for under $200.
For the install, we used the power steering pump and bracket from Spidertrax http://www.spidertrax.com/steering.htm? ?We used the Sky flat arm, but next time I might use their slightly dropped arm.? For the power steering box, you need to get a 16mm x 1.5 to 6AN high pressure adapter.? I got mine from ORME Brothers for $12 http://www.ormebrothers.com/ .? I also talked to Tom at Spidertrax and he said they had a source for these as well, and since they have all the hp and low pressure fittings you will need, they might be the best source for everything.? ?Spidertrax will also have the hp hose you need to use with the fittings to make your own hp hose for cheap.? For the crank pulley, you can get these off of the Suzuki Sprint, a Sidekick or Tracker with ps.? Brent at Trail Tough has them as well.
So let's get to the install.? The first thing is drilling and sleeving the frame.? If you have ever drilled a frame, you know it is TOUGH to get the holes drilled perfectly straight.? For my install, I used a Jethro-jig made out of some seriously hard wood.? Since the wood was 2" thick, it was a big help in guiding the drill bit and not letting me get it tweaked.
This picture with the bolt installed better illustrates the point:
Here is a shot after all three holes were drilled out.? I used 1/2" bolts, and drilled the frame all the way through with 1/2" holes.? I also had to drill the box out to 1/2" as the stock holes were 12mm.
The next step was drilling out the holes in the face of the frame enough to fit the sleeves in.? My sleeves were 7/8" od and 1/2" id.? I used a step drill to enlarge the holes as a step drill does a pretty good job of keeping your holes cenetered and doesn't "wander" like a regular drill bit.
Here is a picture of the first hole reemed out to 7/8":
I then made a plate for the front face of the frame.? I used a piece of 4" wide 3/16" plate.? I used the steering box as a template and drilled the holes to 1/2", and then used the step drill in the drill press to enlarge the holes in the plate to 7/8".
Here is a shot of the face plate with the shims ready for install:
The next pic shows the sleeves welded in.? To get this right, I used a piece of 1/2" rod through the holes to keep the sleeves perfectly centered while welding:
After that, I ground the welds flat:
Then it was time to cut the wheel well out to fit the box.? The rear of this cut needed to eventually be opened up a bit, especially at the bottom to make room for the steering input shaft and u-joint:
Finally, it was time to mount the box.? I should note that the placement of the box, especially the front holes is critical.? ?What you can't see from this picture, is that the two front holes were placed perfectly between the sides of the radiator support.? DO NOT FORGET to get these holes aligned to miss the radiator support before you start drilling.? This picture also shows the additional opening of the fender well.
The steering input shaft had to be shortened a LOT.? Here is a picture from the top:
Here are a couple of pics of the plumbing. I didn't show the ps cooler, but you can see the line running to the front of the radiator where it is located.? For the pump fittings, I used a 90 degree out of the pump and a 45 degree on the box.?
That is about it.? I forgot to take pics of the drag link and pitman arm.? I will do that the next time Matt brings his rig over and update this.? You will see from those pics why I said that I would try the (slightly) dropped OTT or Sky arm next time.? You couldn't slide a piece of paper between the castle nut on the pitman arm ball joint and the frame
?? Although the drag link angle is not bad at all, a slightly dropped arm would help that too.Attachments
-
 1 Comp Jig.webp18.3 KB · Views: 4,950
 -
 12 Top View.webp27.7 KB · Views: 4,576
 -
 13 Pump Plumbing.webp21.5 KB · Views: 4,636
 -
 14 Steering Shaft.webp22.1 KB · Views: 4,620
 -
 11 Box Mounted.webp24.8 KB · Views: 12,217
 -
 10 Fender Cut.webp17.9 KB · Views: 5,209
 -
 9 Welds Ground.webp15.8 KB · Views: 4,623
 -
 8 Welded Sleeves.webp14.3 KB · Views: 4,671
 -
 7 Comp Plate and Sleeves.webp33.3 KB · Views: 4,570
 -
 6 Comp Overdrill.webp23.5 KB · Views: 5,131
 -
 5 Comp Plate.webp16.2 KB · Views: 5,198
 -
 4 Comp Step Drill.webp13 KB · Views: 4,676
 -
 3 Comp Holes.webp20.5 KB · Views: 4,732
 -
 2 Comp Jig.webp12.6 KB · Views: 4,698
 . My cap leaked as well, but I got another one from NAPA that has proven leak proof.