Back To My Roots: A Suzuki Samurai Project

redidbull date=1589285859 said:
I ran 215 BFG ATs and a generic mud tire on the stock rims with no problems.I loved the BFGs. They got me through everything. Jim
 
 
Those BFGs are pricey but awesome tires.  The ones I had on my pickup lasted nearly 70k miles and I abused the living daylight out of them.


C|
 
Thoughts on this package? Would this combo work OK? Is it worth going with 8" wheels or just mounting the 30x9.5x15 tires on the stock wheels?

Thanks

nWdKbT3.jpg
 
My Samurai came with 30x9.5s on 8" wheels.  It's a good tire size although personally I would try to find a 7" wheel instead of 8".  It's mostly a personal preference thing (I don't like the look of wide wheels), but I think having the tires be wider than the wheel helps to protect the bead better when offroad.

15x7 wheels seem to be harder to find now though so I guess get whatever you like and can find.

The factory wheels I think will be a bit too narrow for 30x9.5.  They would probably work but the recommended minimum width is 6.5".


C|
 
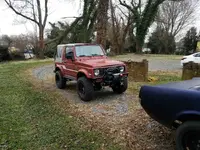
On a less discouraging note, I finally got the Samurai out of the garage for the first time since early-November. I moved it approximately 30' under it's own power! It was really nice to see it in daylight and be able to do a full walk around. The new clutch and rebuilt transmission still seem to function. It has a HORRIBLE alternator whine, even with the radio off. I'm hoping it's only something minor, but concerning. I hosed off all the shop dust and blasted out the wheel wells. From here on in, this is where it will stay. It's so much easier working on it in the driveway than it is in one half of a 18'x18' garage.

The short list of things to wrap up are:

-Build downpipe
-Figure out shock sizing and install
-Install extended brake hoses
-Install rear driveshaft spacer
-Install radiator fans
-Replace water with actual coolant

The Samurai in its dedicated parking spot/repair bay. The differences between these two vehicles is the definition of stark:

nNwSJMy.jpg


So much to do to the exterior, thanks daylight :facepalm::

THYUcB0.jpg


5TfRxce.jpg
 
The Trail Tough Epic Trek SPUA suspension kit I installed recommended 8" wheels with 3.75" backspacing. I ran my 30X9.5R15 tires (retread KM2 clones) on the stock wheels for a while, then switched over to the recommended wheels. I think I got the same ones you've selected, but in black instead of white. Fitment was better (no rubbing, no spacers required) and it also seemed to improve ride quality.
 
Gracana said:
The Trail Tough Epic Trek SPUA suspension kit I installed recommended 8" wheels with 3.75" backspacing. I ran my 30X9.5R15 tires (retread KM2 clones) on the stock wheels for a while, then switched over to the recommended wheels. I think I got the same ones you've selected, but in black instead of white. Fitment was better (no rubbing, no spacers required) and it also seemed to improve ride quality.

Any pics of your setup, please?
 
Welp....the "alternator whine" that I suspected is definitely indeed NOT alternator whine. After investigating the noise a little bit yesterday, it's clearly the fuel pump starving for fuel. If you recall, I used a stock Samurai fuel filter as the pre-pump filter to my inline Walbro unit and apparently it is too restrictive.

Since this pump is clear plastic, you can observe the fuel flowing through it. Or in my case the lack there of. It seems like this filter is too much for the Walbro pump, as it has to suck fuel through this and then push fuel through the ABA post-pump filter. I ordered the Walbro recommended inline pre-pump filter, and I'll see where that gets me. I hope I didn't starve the pump to death, but I've only run the Samurai so far for 5 minutes, tops.

https://www.youtube.com/watch?v=aYI-89QoNxA
 
You may wanna consider 16" Vitara Alloy wheels.....being considerably lighter than 8" steel wheels. Those and some reasonably-weighted 16" tires.
I had 8" steel procomp wheels with 31's. Too heavy for my needs at over 80 lbs per corner.
 
stuntnuts date=1589476504 said:
Any pics of your setup, please?

Sure:
20191123_140938.webp

I had to cut off the outer bumper mounts and flatten the seam inside the front of the fender well because the TT kit pushes the front axle forward. That may not be necessary with your setup.
 
So I swapped out what I thought was the culprit of the noisy fuel pump and the poorly running ABA engine.....the pre-pump filter:

h2uuYt9.jpg


With the Walbro recommended 20 micron pre-pump filter:

CtasQ6E.jpg


lUOtqM1.jpg


And this was the result:

https://www.youtube.com/watch?v=oPqhQpU5KTY

Not good. It was still starving for fuel and I was getting discouraged. I then figured that it had to be a fuel line blockage of some sort. Seeing that all the rubber hoses were brand new and the majority of the hard lines were new as well, I checked the return line, right before it went back into the tank, while running the fuel pump and it was DRY! So I disconnected the return line, at the engine bay, before it went to the original hard line and the fuel pump ran happy as a pig in [censored]. I determined that the original hard line had a blockage of some sort in it. How and what could this be you ask???

There's three lines that come out of the tank on a stock Samurai, feed, return, and vapor line. They all run to the engine bay. The stock return line is tiny diameter, so Acme Adapters instructs you to abandon this line and use what was the stock vapor line, which is a larger diameter, as the new return line. Well that existing vapor line (now the return line) was 34 years old and clogged shut with carbon inside. That didn't really work out for flowing unused fuel back into the tank. So I ripped it out and replaced it with a new line.

I used the same type of "brake line" from NAPA that I used to make my new fuel lines in the engine bay. The clogged up line was actually only 1/4" diameter, I up-sized it to 5/16" diameter to match the supply line. I tried my best to make an exact copy of the removed line with the same bends in all the same places. I did a pretty good job because it went right in the first time and I was even able to secure it to the factory clips in their original locations. Once everything was hooked back up, I ran the fuel pump again and crossed my fingers.

This was the result:

https://www.youtube.com/watch?v=K6qeLqW-jxs

OK, we are in business! It is as quiet as can be and not dead from overworking it while running it with the blockage going on. Time to fire up the ABA and see if that fixed the running issues as well:

https://www.youtube.com/watch?v=Ywf8d1cmmuc

Complete success! Stoked! So the pump was trying its hardest to deliver fuel through the entire system, but getting stuck once it hit the hardline after the firewall. When it would hit the blockage, it couldn't suck anymore fuel into the system until the ABA could burn it all out to make room for more. That's why it was running so rich, while it was also starving for fuel. I'm glad that is over.
 
Up next, I pulled the factory side skirts off the body, so I could give the mounting surfaces a proper cleaning and repaint the badly faded plastics.

Both sides were filthy, but luckily not a lot of rust to worry about:

mped57u.jpg


cqz8fQM.jpg


The side skirts, cleaned up and ready for a light coat of Kyrlon Fusion Satin Black:

qUcQpmv.jpg


I started work on the downpipe. I ordered some 304SS mandrel bends (two 90 degree and two 45 degree) from Summit Racing along with a flex pipe. I also got my exhaust manifold flange back from the laser cutters.

All the pieces:

loEMxzB.jpg


The typical way that people doing TDI swaps run their downpipes is they run them across the backside of the engine, then down to the driver side.

As seen here:

RIeX7wP.jpg


c6WoLEX.jpg


I just can't comprehend why Acme Adapters would suggest that you do this, but whatever. If I'm wrong, I'm wrong, but I chose to go down the passenger side and stay on the passenger side. I temporarily bolted up the new flange to the exhaust manifold and started getting creative. One piece at a time, measure, cut, and position until it fit good. Then I'd move onto the next segment. I continued this process several time until I got to the underbody and near horizontal. I have one more segment to figure out, and then I will tack weld it together for a final fitment:

dCTBybE.jpg


6aqINd0.jpg


PzhHdt2.jpg


g36YcX2.jpg


Gjizsmf.jpg


hRQFwgh.jpg


Dk1pUXV.jpg


bBVbuoy.jpg


dlJswxg.jpg


My downpipe is HEAVILY INFLUENCED by an Audi B5 1.8T downpipe, which takes the same path as that of the ABA Samurai. I plan to add a mounting tab to somewhere on the transmission, then add in the flex joint, then the cat, and finally to the remainder of the exhaust.

My inspiration:

3AuaqDj.jpg


And my last update for this time is the rear bumper. I desperately needed a new front bumper because it was dented by the previous owner, so I ordered one. It looked so good, all new in the front, that I had to get a matching rear one as well.

I pulled the old one off and blasted out 34 years of petrified Texas mud behind it and above the fuel tank. I'm quite satisfied with how clean it came out:

zMRH66H.jpg


RAsvWbp.jpg


Once the underside of the rear end was all clean and dry, I installed the new bumper.

So much better:

B2lYfh7.jpg


And finished it off by reinstalling and re-gasketing the taillights:

cnAY0aX.jpg


That's all for now. Up next, finish up the downpipe, paint the plastics, and clean and detail the paintwork.
 
stuntnuts said:
It seems like that's what most everyone on here wants to see, so here it is...
Awesome! I have a red 1987 soft top. Mine was as gross as yours! The motor is at the engine rebuilder, should be ready by the end of this week. I've been cleaning engine bay. The engine had a bad rear main seal, also the previous owner too cheap to buy a Breather for the the engine, wrapped the hole with aluminum foil, clamped it. The vehicle was driven that way for years. I took pounds of filth out from the engine bay.

I thought I was excited about getting my motor back, It's even more so reading your build posts!

Thank You For Sharing!
 
stuntnuts date=1591037376 said:
The typical way that people doing TDI swaps run their downpipes is they run them across the backside of the engine, then down to the driver side.

As seen here:

RIeX7wP.jpg


c6WoLEX.jpg


I just can't comprehend why Acme Adapters would suggest that you do this, but whatever. If I'm wrong, I'm wrong, but I chose to go down the passenger side and stay on the passenger side. I temporarily bolted up the new flange to the exhaust manifold and started getting creative. One piece at a time, measure, cut, and position until it fit good. Then I'd move onto the next segment. I continued this process several time until I got to the underbody and near horizontal. I have one more segment to figure out, and then I will tack weld it together for a final fitment:


It's done that way so you don't have to contend with the front driveshaft.  Also you can keep it tucked up closer to the body if you don't have to go under the transmission.  You can do it either way really.  Just make sure the driveshaft doesn't hit the down pipe when the front suspension compresses.


C|
 
I started welding up the downpipe over the weekend. I will add in the flex coupler, hangers, and install it once the new catalytic converter arrives, to size everything up. No weld porn material here, so don't expect much, just basic TIG welding on a material that I have never worked with:

bcCnB6s.jpg


WDUfcem.jpg


AOM6qZC.jpg
 
Nice welds for sure, that's the kind of exhaust these vehicles need [red_s] .  Wish I wasn't too scared to try.  I always thought they liked to keeping exhaust on the opposite side from the fuel lines for lawyer reasons 
 
Deadlight44 date=1591665356 said:
Nice welds for sure, that's the kind of exhaust these vehicles need [red_s] .  Wish I wasn't too scared to try.  I always thought they liked to keeping exhaust on the opposite side from the fuel lines for lawyer reasons
 
 
That too.  You'll find that vehicles without dual exhaust always have the exhaust outlet on the opposite side from the fuel filler.


C|
 
The new catalytic converter showed up yesterday, so I crawled under the Samurai again to figure out how I'm gonna pipe all this crap together:

R3oruLS.jpg


The dual slim 10" ebay fans (eff the haters) showed up as well, so I mounted those. I still need to wire them up:

y9WmmRF.jpg


Jw4kSW7.jpg


XpEdn5c.jpg


1QPmd8A.jpg


Up next, more seat time behind the welding bench to get the flex coupler welded on.
 

https://www.helpavetshine.us/help-a-vet-shine
Back
Top Bottom