erik the red
Well-known member
Ok....finally in the game!! This showed up in my driveway yesterday; a 1972 Suzuki LJ20V.


It's got some serious rust in the driver's rocker panel

and both fender flares are rusty as well.


The inside tub needs to be cleaned and evaluated for rust...


some there for sure but not sure quite how badly rusted through. Battery "compartment" is completely rusted through. Currently the battery is wired up in a box under the passenger seat. (RHD)

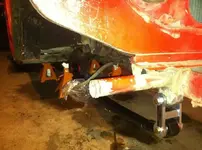
Someone in Alaska owned it, and put on a STOUT homebrew Dozer bumper cut to fit. Suspension looks rough...springs have negative curve. It isn't currently running....PO was uninformed about the oil injection system and fed the motor mixed gas. Probably fouled the plugs, not to mention goobered up the carb. Came with a box O' spare parts....water pump, carb, radiator and most of an engine rebuild kit. Got a screamin' deal on it, AND the PO loaded it up on a trailer and dropped the LJ off in my driveway!!!!


Lookin' forward to a resto. project with the kids! Let me know what you think. Any tips/advice with the body and engine work are much appreciated, and I am super stoked to finally be a part of the LJ craze!
It's got some serious rust in the driver's rocker panel
and both fender flares are rusty as well.
The inside tub needs to be cleaned and evaluated for rust...
some there for sure but not sure quite how badly rusted through. Battery "compartment" is completely rusted through. Currently the battery is wired up in a box under the passenger seat. (RHD)
Someone in Alaska owned it, and put on a STOUT homebrew Dozer bumper cut to fit. Suspension looks rough...springs have negative curve. It isn't currently running....PO was uninformed about the oil injection system and fed the motor mixed gas. Probably fouled the plugs, not to mention goobered up the carb. Came with a box O' spare parts....water pump, carb, radiator and most of an engine rebuild kit. Got a screamin' deal on it, AND the PO loaded it up on a trailer and dropped the LJ off in my driveway!!!!
Lookin' forward to a resto. project with the kids! Let me know what you think. Any tips/advice with the body and engine work are much appreciated, and I am super stoked to finally be a part of the LJ craze!
![[thumbsup]](https://cdn.jsdelivr.net/joypixels/assets/8.0/png/unicode/64/1f44d.png "Thumbs up [thumbsup]")