Zuk named Stitch
Well-known member
Ok, after lack of finding a good how-to in the neon seats.....i used the info i could find and did "Neon seats for DUMMIES" 
Parts Needed:
- Dodge/Plymouth/Chrysler Neon seat (up to 99', i don't know about newer)
- 4, grade 8, Nuts, washers and bolts (about .5" length on the bolt, 6mm i think is the size i used)
- Stock Samurai Seats
- 6 pack of Heineken (optional)
Tools Needed:
- 4.5" Grinder, removing spot welds
- Drill and bits, opening beer (again...optional)
- Hammer
- Chisel
- t20 torx (for removing plastic cover)
- 10mm socket
- 12mm socket
-Start by removing your Samurai seats, four -12mm bolts
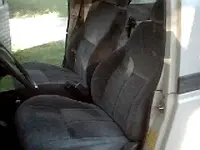
-Here is the Sammi seats aside the Neon seats-

-Remove the rail from your samurai seat, its four, 10mm bolts - you will have to manipulate the seat rail to access the bolts

-Set these rails aside, this is all you need from your old seats.

Now for the Neon seats,
-Start with removing the two, 10mm bolts shown below,

-now remove the two, 10mm bolts on the side, they hold the bottom and the back together

-You need a t20 torx driver to remover this cover, then the two 10mm bolts are accessible.


Now that the rails are off, you need to remove the triangle shaped brackets.
-There are four rivets on one side and three on the other. I started to drill mine and realized it was easier to grind them off. You also have two spot welds on each bracket to remove.


-You need to test fit and mark so you know where to drill your holes.

-Some of the existing holes are close enough use, if widen'd

-Then use the four bolts to hold the brackets to the rails


NOW- put the rest back together and re-install in your sammi!

My Rump-o-meter gives these seats an 8.5 over the stockers!! :-X
Parts Needed:
- Dodge/Plymouth/Chrysler Neon seat (up to 99', i don't know about newer)
- 4, grade 8, Nuts, washers and bolts (about .5" length on the bolt, 6mm i think is the size i used)
- Stock Samurai Seats
- 6 pack of Heineken (optional)
Tools Needed:
- 4.5" Grinder, removing spot welds
- Drill and bits, opening beer (again...optional)
- Hammer
- Chisel
- t20 torx (for removing plastic cover)
- 10mm socket
- 12mm socket
-Start by removing your Samurai seats, four -12mm bolts
-Here is the Sammi seats aside the Neon seats-
-Remove the rail from your samurai seat, its four, 10mm bolts - you will have to manipulate the seat rail to access the bolts
-Set these rails aside, this is all you need from your old seats.
Now for the Neon seats,
-Start with removing the two, 10mm bolts shown below,
-now remove the two, 10mm bolts on the side, they hold the bottom and the back together
-You need a t20 torx driver to remover this cover, then the two 10mm bolts are accessible.
Now that the rails are off, you need to remove the triangle shaped brackets.
-There are four rivets on one side and three on the other. I started to drill mine and realized it was easier to grind them off. You also have two spot welds on each bracket to remove.
-You need to test fit and mark so you know where to drill your holes.
-Some of the existing holes are close enough use, if widen'd
-Then use the four bolts to hold the brackets to the rails
NOW- put the rest back together and re-install in your sammi!
My Rump-o-meter gives these seats an 8.5 over the stockers!! :-X


")