NewSamiNut
Well-known member
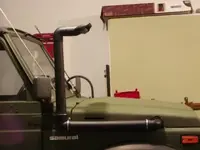
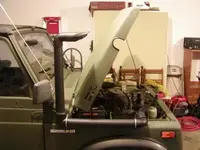
I know there are several threads on this already but I took a slightly different approach. Here's a light-duty snorkel for a Sami you can put together for about $75 (if you buy everything new) a lot at less, if you have a donor shop vac lying around. It's clean, simple, and requires very little modification to the vehicle itself. I refer to it as ?light duty? because it is NOT intended for deep-water crossing. Just a little added insurance if a mud hole or stream is deeper than it looks (or you happen to be the one that finds the big rut).
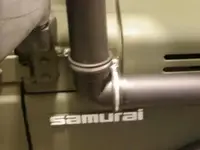
The hose, tubes & fittings are all 2.5? shop vac accessories. I chose this diameter because that?s the diameter of the inlet on the air cleaner (retain the rubber elbow & clamp). The OEM set-up actually chokes down the inside diameter to less than 1.5? in the pre-heat valve. This setup adds about 36? to the end of the stock intake tube length-wise but is probably no more restrictive because the ID is the same all the way down. It should actually breathe a little better. Personally, I think its much cleaner looking than PVC or ABS pipe & fittings. Note: Over half the people who have seen this since I installed it don?t recognize it as a modified vacuum cleaner hose!
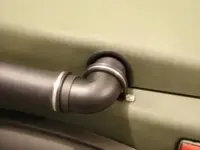
The key components that make this project work are the 90? fittings and the aircraft cushion clamps. The 90?s are actually right-angle brush attachments. The brush & trim rings are easily removed (they pop right off the end) leaving you with the same tapered ends as the extension wands. I ordered the 2.5? clamps (MS211919-DG40) from an internet aircraft parts supplier. Again, it lends a clean purpose-built look you can?t get in the plumbing department. By-the-by, these ?Mil Spec? clamps come in a full range of sizes and have just as many uses on a 4x4 as they do on an aircraft (brake lines, wire harnesses, on-board-air tubing, vacuum lines, fuel lines, etc). All the tube joints, except the top two (explanation below) are glued & clamped for security & water tightness.
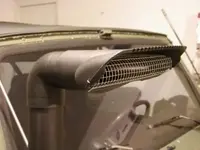
This arrangement has a few advantages over the prefab set-ups. One of which is it can be configured in one of two ways; inlet facing forward (for ?ram? air) OR; inlet facing backwards (for foul weather). It still allows for opening the hood and/or lowering the windshield. The intake ?hood? must be removed (& later reinstalled) to open the hood all the way back or fold the windshield. Also, if the top of the snorkel gets snagged on something (or visa versa), it should pivot away and/or separate before it breaks. I?d rather stop to pick up & reinstall something that got knocked off than pick up pieces of something that broke. And, last but not least, if it does break, replacement parts are easily obtainable at any home improvement store.
It's a little more expensive than plastic plumbing but I think its worth it. The other main disadvantage is the nature of components themselves. You have to work with the vac tubing and connectors as they are. The pieces are tapered to fit together one inside the next. If you modify them, the taper at the new connecting points is incompatible and the resulting pieces are useless (I cut up one 20? extension trying different configurations ? it didn?t work).
The photos should explain the rest. Feel free to throw out comments or questions. If I get enough requests I?ll take the time to do a more detailed ?How To? article.
The hose, tubes & fittings are all 2.5? shop vac accessories. I chose this diameter because that?s the diameter of the inlet on the air cleaner (retain the rubber elbow & clamp). The OEM set-up actually chokes down the inside diameter to less than 1.5? in the pre-heat valve. This setup adds about 36? to the end of the stock intake tube length-wise but is probably no more restrictive because the ID is the same all the way down. It should actually breathe a little better. Personally, I think its much cleaner looking than PVC or ABS pipe & fittings. Note: Over half the people who have seen this since I installed it don?t recognize it as a modified vacuum cleaner hose!
The key components that make this project work are the 90? fittings and the aircraft cushion clamps. The 90?s are actually right-angle brush attachments. The brush & trim rings are easily removed (they pop right off the end) leaving you with the same tapered ends as the extension wands. I ordered the 2.5? clamps (MS211919-DG40) from an internet aircraft parts supplier. Again, it lends a clean purpose-built look you can?t get in the plumbing department. By-the-by, these ?Mil Spec? clamps come in a full range of sizes and have just as many uses on a 4x4 as they do on an aircraft (brake lines, wire harnesses, on-board-air tubing, vacuum lines, fuel lines, etc). All the tube joints, except the top two (explanation below) are glued & clamped for security & water tightness.
This arrangement has a few advantages over the prefab set-ups. One of which is it can be configured in one of two ways; inlet facing forward (for ?ram? air) OR; inlet facing backwards (for foul weather). It still allows for opening the hood and/or lowering the windshield. The intake ?hood? must be removed (& later reinstalled) to open the hood all the way back or fold the windshield. Also, if the top of the snorkel gets snagged on something (or visa versa), it should pivot away and/or separate before it breaks. I?d rather stop to pick up & reinstall something that got knocked off than pick up pieces of something that broke. And, last but not least, if it does break, replacement parts are easily obtainable at any home improvement store.
It's a little more expensive than plastic plumbing but I think its worth it. The other main disadvantage is the nature of components themselves. You have to work with the vac tubing and connectors as they are. The pieces are tapered to fit together one inside the next. If you modify them, the taper at the new connecting points is incompatible and the resulting pieces are useless (I cut up one 20? extension trying different configurations ? it didn?t work).
The photos should explain the rest. Feel free to throw out comments or questions. If I get enough requests I?ll take the time to do a more detailed ?How To? article.
Attachments
-
 Snorkle 003.webp11.3 KB · Views: 658
 -
 Snorkle 005.webp12.6 KB · Views: 464
 -
 Snorkle 007.webp11.7 KB · Views: 393
 -
 Snorkle 009.webp7.3 KB · Views: 400
 -
 Snorkle 010.webp4.7 KB · Views: 404
 -
 Snorkle 011.webp5.7 KB · Views: 380
 -
 Snorkle 014.webp10.7 KB · Views: 423
 -
 Snorkle 017.webp12.6 KB · Views: 490
 -
 Snorkle 020.webp9.8 KB · Views: 578
") ). I mostly just wanted to keep the hose run as short as possible (better airflow through the smooth pipe) and under the hood (less vulnerable to puncture). Although I may run a bracket from behind the (doorless) mirror mount to give it even more support.
). I mostly just wanted to keep the hose run as short as possible (better airflow through the smooth pipe) and under the hood (less vulnerable to puncture). Although I may run a bracket from behind the (doorless) mirror mount to give it even more support.
