coldblud
Well-known member
After researching the materials and cost of professional installation, I decided to do the job myself. This job cost a total of approx. $100.
1. Measure around the side top of the Sami-you will need this for the trim
2.Go to Home Depot or Lowe's and buy 2 sheets of Luan, wood trim of your choice equal to the measurement around the top. and a stick of flat moulding of your choice that will go across the middle of the top where the light is.
3. From JC Whitney, order a roll of insulation that has the aluminum on one side. This will insulate from heat coming in from sun and noise too. Put in all places where the panels are being replaced and ceiling(especially here to keep the paneling from flexing too much.
4. Measure the top side to side from the mid section to the front and cut a piece of luan to match making sure that it will go into the metal trim around the top. Fold it slightly and slide it into place.
5. Do the same from the mid section to the rear-It has got to be close and just past the lip of the metal trim.
6. Cut a piece of the flat wide moulding to reach across the mid of the top where the two pieces of luan meet, allowing a little longer than the actual measurement. Bend it and put each end in place with the bowed trim down and then push up int he middle and it will snap into place. Be sure to glue both pieces before doing this and then have a couple of pieces of wood that will wedge from floor to the ceiling, hold the trim and panels in place until they dry.
7. While this is drying, remove the front panels, lay down on a piece of the luan, mark the outline, all the door handle and window holes. Then cut the luan with a sharp thick bladed knife. The luan is 1/8' to 1/4' thickness and this keeps it from splintering as if using a saw.
8. Re-attach the panels
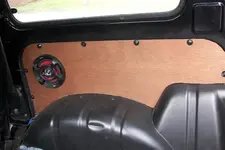
9. Do the same for the rear panels- I marked my speakers just behind the seats and mounted them flush inside the panels..
10. Re-attach these
11. The luan I bought was birch wood, so after all the glue drys, I put a medium dark oak stain on it.
That's it and very nice looking for a cheap price... Custom wood interior lol.....
1. Measure around the side top of the Sami-you will need this for the trim
2.Go to Home Depot or Lowe's and buy 2 sheets of Luan, wood trim of your choice equal to the measurement around the top. and a stick of flat moulding of your choice that will go across the middle of the top where the light is.
3. From JC Whitney, order a roll of insulation that has the aluminum on one side. This will insulate from heat coming in from sun and noise too. Put in all places where the panels are being replaced and ceiling(especially here to keep the paneling from flexing too much.
4. Measure the top side to side from the mid section to the front and cut a piece of luan to match making sure that it will go into the metal trim around the top. Fold it slightly and slide it into place.
5. Do the same from the mid section to the rear-It has got to be close and just past the lip of the metal trim.
6. Cut a piece of the flat wide moulding to reach across the mid of the top where the two pieces of luan meet, allowing a little longer than the actual measurement. Bend it and put each end in place with the bowed trim down and then push up int he middle and it will snap into place. Be sure to glue both pieces before doing this and then have a couple of pieces of wood that will wedge from floor to the ceiling, hold the trim and panels in place until they dry.
7. While this is drying, remove the front panels, lay down on a piece of the luan, mark the outline, all the door handle and window holes. Then cut the luan with a sharp thick bladed knife. The luan is 1/8' to 1/4' thickness and this keeps it from splintering as if using a saw.
8. Re-attach the panels
9. Do the same for the rear panels- I marked my speakers just behind the seats and mounted them flush inside the panels..
10. Re-attach these
11. The luan I bought was birch wood, so after all the glue drys, I put a medium dark oak stain on it.
That's it and very nice looking for a cheap price... Custom wood interior lol.....